Git Reference
Git教程:https://www.liaoxuefeng.com/wiki/896043488029600
Git 教程Pro:https://gitee.com/progit/(推荐)
Git基础
常用命令
仓库
1
2
3
4
5
6
7
8
# 在当前目录新建一个Git代码库
$ git init

# 新建一个目录,将其初始化为Git代码库
$ git init [project-name]

# 下载一个项目和它的整个代码历史
$ git clone [url]
配置
1
2
3
4
5
6
7
8
9
# 显示当前的Git配置
$ git config --list

# 编辑Git配置文件
$ git config -e [--global]

# 设置提交代码时的用户信息
$ git config [--global] user.name "[name]"
$ git config [--global] user.email "[email address]"
增加/删除文件
1
2
3
4
5
6
7
8
9
10
11
12
13
14
15
16
17
18
19
20
21
# 添加指定文件到暂存区
$ git add [file1] [file2] ...

# 添加指定目录到暂存区,包括子目录
$ git add [dir]

# 添加当前目录的所有文件到暂存区
$ git add .

# 添加每个变化前,都会要求确认
# 对于同一个文件的多处变化,可以实现分次提交
$ git add -p

# 删除工作区文件,并且将这次删除放入暂存区
$ git rm [file1] [file2] ...

# 停止追踪指定文件,但该文件会保留在工作区
$ git rm --cached [file]

# 改名文件,并且将这个改名放入暂存区
$ git mv [file-original] [file-renamed]
代码提交
1
2
3
4
5
6
7
8
9
10
11
12
13
14
15
16
17
18
# 提交暂存区到仓库区
$ git commit -m [message]

# 提交暂存区的指定文件到仓库区
$ git commit [file1] [file2] ... -m [message]

# 提交工作区自上次commit之后的变化,直接到仓库区
$ git commit -a

# 提交时显示所有diff信息
$ git commit -v

# 使用一次新的commit,替代上一次提交
# 如果代码没有任何新变化,则用来改写上一次commit的提交信息
$ git commit --amend -m [message]

# 重做上一次commit,并包括指定文件的新变化
$ git commit --amend [file1] [file2] ...
分支
1
2
3
4
5
6
7
8
9
10
11
12
13
14
15
16
17
18
19
20
21
22
23
24
25
26
27
28
29
30
31
32
33
34
35
36
37
38
39
40
41
42
# 列出所有本地分支
$ git branch

# 列出所有远程分支
$ git branch -r

# 列出所有本地分支和远程分支
$ git branch -a

# 新建一个分支,但依然停留在当前分支
$ git branch [branch-name]

# 新建一个分支,并切换到该分支
$ git checkout -b [branch]

# 新建一个分支,指向指定commit
$ git branch [branch] [commit]

# 新建一个分支,与指定的远程分支建立追踪关系
$ git branch --track [branch] [remote-branch]

# 切换到指定分支,并更新工作区
$ git checkout [branch-name]

# 切换到上一个分支
$ git checkout -

# 建立追踪关系,在现有分支与指定的远程分支之间
$ git branch --set-upstream [branch] [remote-branch]

# 合并指定分支到当前分支
$ git merge [branch]

# 选择一个commit,合并进当前分支
$ git cherry-pick [commit]

# 删除分支
$ git branch -d [branch-name]

# 删除远程分支
$ git push origin --delete [branch-name]
$ git branch -dr [remote/branch]
标签
1
2
3
4
5
6
7
8
9
10
11
12
13
14
15
16
17
18
19
20
21
22
23
24
25
26
# 列出所有tag
$ git tag

# 新建一个tag在当前commit
$ git tag [tag]

# 新建一个tag在指定commit
$ git tag [tag] [commit]

# 删除本地tag
$ git tag -d [tag]

# 删除远程tag
$ git push origin :refs/tags/[tagName]

# 查看tag信息
$ git show [tag]

# 提交指定tag
$ git push [remote] [tag]

# 提交所有tag
$ git push [remote] --tags

# 新建一个分支,指向某个tag
$ git checkout -b [branch] [tag]
查看信息
1
2
3
4
5
6
7
8
9
10
11
12
13
14
15
16
17
18
19
20
21
22
23
24
25
26
27
28
29
30
31
32
33
34
35
36
37
38
39
40
41
42
43
44
45
46
47
48
49
50
51
52
53
54
55
56
57
58
59
60
# 显示有变更的文件
$ git status

# 显示当前分支的版本历史
$ git log

# 显示commit历史,以及每次commit发生变更的文件
$ git log --stat

# 搜索提交历史,根据关键词
$ git log -S [keyword]

# 显示某个commit之后的所有变动,每个commit占据一行
$ git log [tag] HEAD --pretty=format:%s

# 显示某个commit之后的所有变动,其"提交说明"必须符合搜索条件
$ git log [tag] HEAD --grep feature

# 显示某个文件的版本历史,包括文件改名
$ git log --follow [file]
$ git whatchanged [file]

# 显示指定文件相关的每一次diff
$ git log -p [file]

# 显示过去5次提交
$ git log -5 --pretty --oneline

# 显示所有提交过的用户,按提交次数排序
$ git shortlog -sn

# 显示指定文件是什么人在什么时间修改过
$ git blame [file]

# 显示暂存区和工作区的差异
$ git diff

# 显示暂存区和上一个commit的差异
$ git diff --cached [file]

# 显示工作区与当前分支最新commit之间的差异
$ git diff HEAD

# 显示两次提交之间的差异
$ git diff [first-branch]...[second-branch]

# 显示今天你写了多少行代码
$ git diff --shortstat "@{0 day ago}"

# 显示某次提交的元数据和内容变化
$ git show [commit]

# 显示某次提交发生变化的文件
$ git show --name-only [commit]

# 显示某次提交时,某个文件的内容
$ git show [commit]:[filename]

# 显示当前分支的最近几次提交
$ git reflog
远程同步
1
2
3
4
5
6
7
8
9
10
11
12
13
14
15
16
17
18
19
20
21
22
23
# 下载远程仓库的所有变动
$ git fetch [remote]

# 显示所有远程仓库
$ git remote -v

# 显示某个远程仓库的信息
$ git remote show [remote]

# 增加一个新的远程仓库,并命名
$ git remote add [shortname] [url]

# 取回远程仓库的变化,并与本地分支合并
$ git pull [remote] [branch]

# 上传本地指定分支到远程仓库
$ git push [remote] [branch]

# 强行推送当前分支到远程仓库,即使有冲突
$ git push [remote] --force

# 推送所有分支到远程仓库
$ git push [remote] --all
撤销
1
2
3
4
5
6
7
8
9
10
11
12
13
14
15
16
17
18
19
20
21
22
23
24
25
26
27
28
29
30
31
# 恢复暂存区的指定文件到工作区
$ git checkout [file]

# 恢复某个commit的指定文件到暂存区和工作区
$ git checkout [commit] [file]

# 恢复暂存区的所有文件到工作区
$ git checkout .

# 重置暂存区的指定文件,与上一次commit保持一致,但工作区不变
$ git reset [file]

# 重置暂存区与工作区,与上一次commit保持一致
$ git reset --hard

# 重置当前分支的指针为指定commit,同时重置暂存区,但工作区不变
$ git reset [commit]

# 重置当前分支的HEAD为指定commit,同时重置暂存区和工作区,与指定commit一致
$ git reset --hard [commit]

# 重置当前HEAD为指定commit,但保持暂存区和工作区不变
$ git reset --keep [commit]

# 新建一个commit,用来撤销指定commit
# 后者的所有变化都将被前者抵消,并且应用到当前分支
$ git revert [commit]

# 暂时将未提交的变化移除,稍后再移入
$ git stash
$ git stash pop
其他
1
2
# 生成一个可供发布的压缩包
$ git archive
From 阮一峰老师的博客文章《常用 Git 命令清单》
Git仓库
与Git仓库打交道一般有两种方式。
- 第一种是已有云端项目(开源项目或者项目组的项目),拉取下来进行二次开发;
- 第二种是有一个本地仓库,开发完成后(或者维护中)发布到类似于Github等云端仓库。
但是要明确的是,Git是一种分布式版本管理系统,它并不依赖于云端仓库的存在。
因此以本地仓库,从零开始进行Git仓库管理。
首先,创建一个空的文件夹(或者把一个已有的路径作为仓库),在此处打开终端,输入
1
git init
如果是第一种情况,从云端拉取项目开始,只需要改为git clone url.
此时可以看到文件夹中增加了一个.git文件夹,该文件夹即git维护本地仓库的储存路径,里面将包含该仓库所有的信息,包括不同版本、各分支、提交记录等全部信息。如果我们使用git clone命令,观察一下该命令,举例:
1
git clone https://github.com/Olimiya/olimiya.github.io.git
可以看到本质上就是从xxx.git从取出相应的数据和信息进行拷贝分发。
回到我们空的目录。添加文件README,把它放入版本控制中:
1
2
git add README
git commit -m "init repository"
对于已有的文件夹,要添加所有已有的文件,使用匹配符,git add .
此时我们得到了一个Git版本控制仓库。
状态、变更和回退
进一步理解Git版本变更的处理,以便于加以控制。
首先使用git status查看一下仓库现在的状态:
1
2
3
$ git status
On branch master
nothing to commit, working tree clean
Oh clean,让人喜悦的描述。
再进一步操作以前,先认识git的一些基本概念。
git相关区域概念如下图所示,包含三个目录的概念:
- **working directory: ** 工作目录。就是打开一个git仓库看到的内容。
- **staging area: **暂存目录。为已经提交的修改,但未最终存入git仓库。包含在.git文件夹中。
- **git directory: **git仓库目录。包含git中固化一切信息,包括各个分支内容、提交修改的历史等等。包含在.git文件夹中。

文件状态生命周期的示意图如下图所示,注意其状态迁移。在图中文件有四种状态。
- untracked: 未追踪的文件。一般为新添加未纳入git管理的文件或.gitignore中的文件。
- **unmodified: **未修改的文件。即保持up to date的clean状态。
- modified: **修改的文件。一般为就是同步后进行修改后的文件。Git将这些文件列在Changes not staged for commit**中。
- staged: **文件修改存在暂存区的状态。Git将这些文件列在Changes to be committed**中。
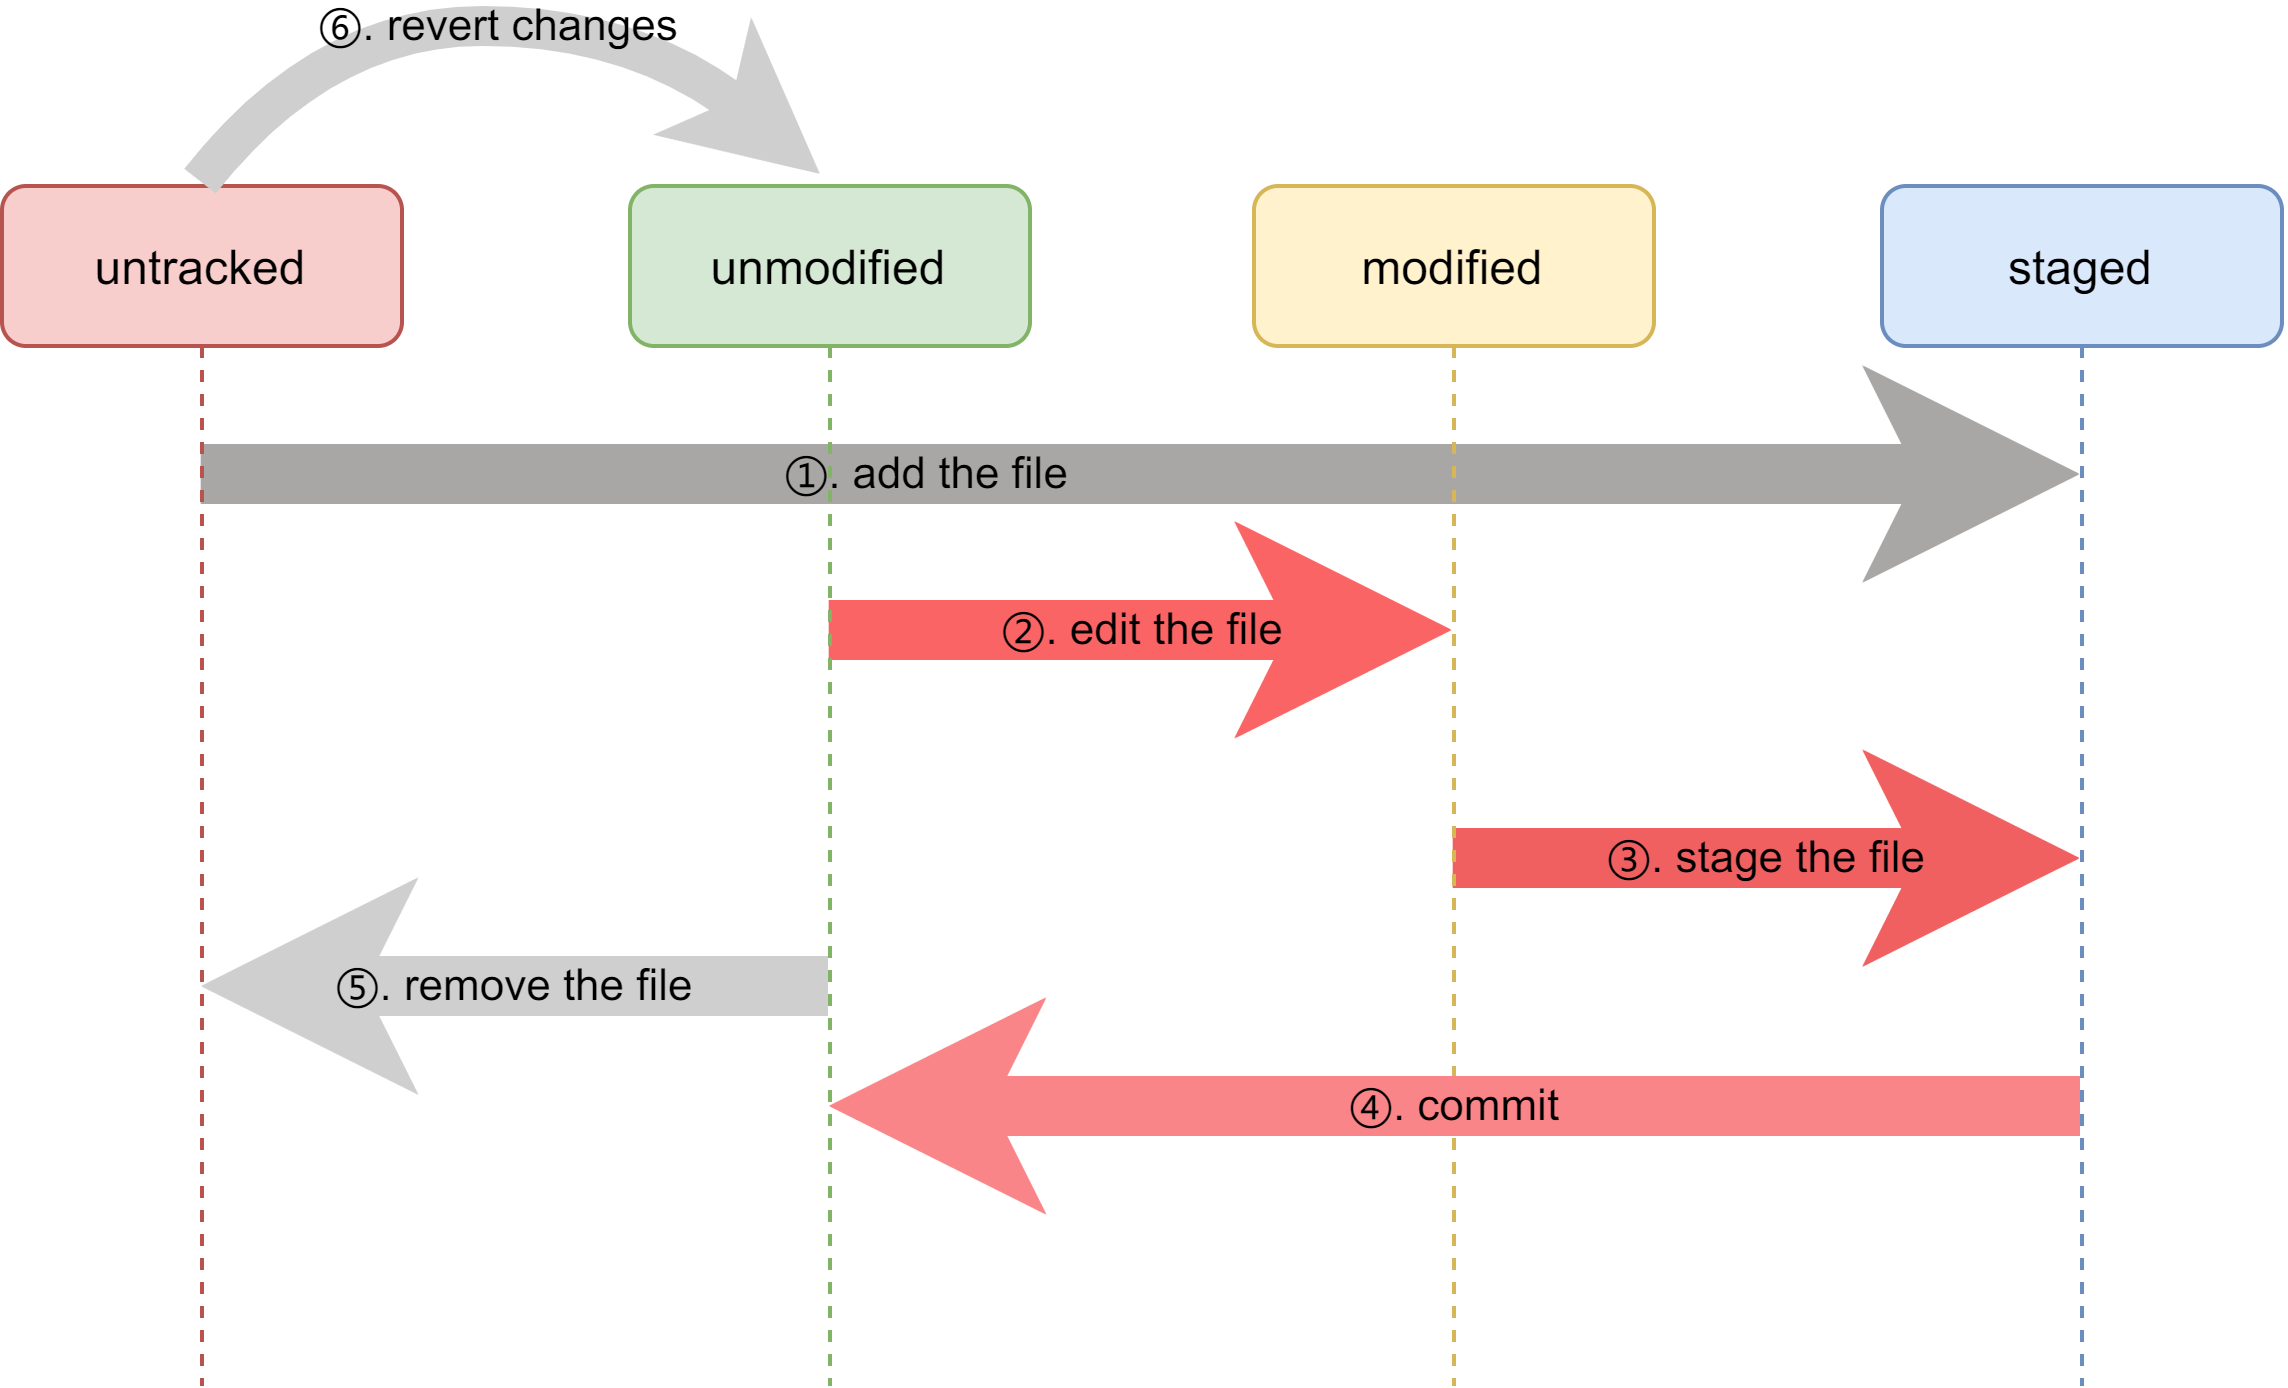
有了文件状态和区域的概念,进一步讨论文件状态的变迁。
- add the file:
untracked->staged迁移。将添加的文件的修改提交到暂存区。使用命令:git add file. - edit the file:
unmodified->modified迁移。就是对文件进行了编辑操作。 - stage the file:
modified->staged迁移。提交对文件编辑的修改。使用命令:git stage file或者git add file(git add操作自动识别新加文件或者修改,统一使用该命令较好)。 - commit:
staged->unmodified迁移。提交暂存区的所有修改。使用命令:git commit。 - remove the file:
unmodified->untracked迁移。就是将git版本管理的文件清除出版本管理。使用命令:git rm file或者git rm --cached file。前者实际删除文件、后者不删除文件。 - **revert changes: **补充一个不属于上述文件状态变更,但较为常用的操作是,将新增的一堆文件直接删掉。对于untracked的单个文件,直接删掉(右键删除)就行。如果是很多untracked文件,对于工作区的概念来说,就是revert掉这些changes。使用命令:
下面实例操作以上迁移过程:
- add the file
1
2
3
4
5
6
7
8
9
10
$ notepad++.exe test_add.txt

$ git add test_add.txt

# 这里用git st = git status. 详见Git玩法->别名一节,其他同理
$ git st
On branch master
Changes to be committed:
  (use "git restore --staged <file>..." to unstage)
        new file:   test_add.txt
- edit the file
修改一下已有的README(比如在最后加一个TEST_EDIT),再查看一次:
1
2
3
4
5
6
7
8
9
10
11
12
$ notepad++.exe README

$ git st
On branch master
Changes to be committed:
  (use "git restore --staged <file>..." to unstage)
        new file:   test_add.txt

Changes not staged for commit:
  (use "git add <file>..." to update what will be committed)
  (use "git restore <file>..." to discard changes in working directory)
        modified:   README
修改文件使该文件变成了modified,并且由于修改后没有提交,所以是Changes not staged for commit。
- stage the file
我们使用git add提交一下,再查看状态:
1
2
3
4
5
6
7
8
9
$ git add README

$ git st
On branch master
Changes to be committed:
  (use "git restore --staged <file>..." to unstage)
        modified:   README
        new file:   test_add.txt
文件还是modified,但是已经属于Changes to be committed。
这里再commit提交以前,再次修改README,然后查看状态。
1
2
3
4
5
6
7
8
9
10
11
12
13
$ notepad++ README

$ git st
On branch master
Changes to be committed:
  (use "git restore --staged <file>..." to unstage)
        modified:   README
        new file:   test_add.txt

Changes not staged for commit:
  (use "git add <file>..." to update what will be committed)
  (use "git restore <file>..." to discard changes in working directory)
        modified:   README
可以看到文件的两次修改都出现了,第一次被记录为Changes to be committed(由于使用了add),第二次被记录为Changes not staged for commit(未使用add)。
Git中的状态是面向修改的,本质上是提交的操作把修改文件存入.git中。第一次修改完使用add把修改后的README存入staged空间(.git中),第二次修改没有add前,仅仅在工作目录中存在。
此时使用commit命令,仅仅会将staged空间中的文件写入版本数据库(即第一次修改),而第二次修改不会写入(仍保留在工作目录),即git的提交操作仅支持从stage仓库到git仓库。
最后再试试新建一个文件,查看状态:
1
2
3
4
5
6
7
8
9
10
11
12
13
14
15
16
17
$ notepad++ test

$ git status
On branch master
Changes to be committed:
  (use "git restore --staged <file>..." to unstage)
        modified:   README
        new file:   test_add.txt

Changes not staged for commit:
  (use "git add <file>..." to update what will be committed)
  (use "git restore <file>..." to discard changes in working directory)
        modified:   README

Untracked files:
  (use "git add <file>..." to include in what will be committed)
        test
可以看到Git仓库中有三种状态存在:
- Changes to be committed
- Changes not staged for commit
- Untracked files
所有复杂的版本控制就是由这三种状态迁移构成。
- commit
这个时候使用git commit上传。可以看到Changes not staged for commit和Untracked files都仍维持原状。
1
2
3
4
5
6
7
8
9
10
11
$ git ci -m "test commit file with not staged file"

$ git st
Changes not staged for commit:
  (use "git add <file>..." to update what will be committed)
  (use "git restore <file>..." to discard changes in working directory)
        modified:   README

Untracked files:
  (use "git add <file>..." to include in what will be committed)
        test
上述状态迁移的过程主要是正向的迁移,即从Untracked files->Changes not staged for commit=>Changes to be committed,就是上面验证的顺序,即新建文件->add, commit->modified->add的过程。
接着看看逆向的迁移,即回退的操作。
- unstage the file
首先,从Changes to be committed到Changes not staged for commit,即如何将存入staged空间的数据返回工作目录。
这里首先将刚刚untracked的test文件删除。然后使用git add添加README最后not staged的状态。
回退使用git reset或者git restore --staged:
1
2
3
4
5
6
7
8
9
10
11
12
13
14
15
16
$ git status
On branch master
Changes to be committed:
  (use "git restore --staged <file>..." to unstage)
        modified:   README
$ git reset HEAD README
Unstaged changes after reset:
M       README
$ git status
On branch master
Changes not staged for commit:
  (use "git add <file>..." to update what will be committed)
  (use "git restore <file>..." to discard changes in working directory)
        modified:   README

no changes added to commit (use "git add" and/or "git commit -a")
git reset HEAD将该文件回退到提交的最近一个版本。
可以看到现在已经回退到Changes not staged for commit。
- drop change
然后是从Changes not staged for commit回退到修改前。使用git restore:
1
2
3
4
5
6
$ git restore README
/mnt/f/program/test/git on master ⌚ 22:14:50
$ git status
On branch master
nothing to commit, working tree clean
重新回到了Clean,Great!(仔细看上面的输出,其实使用git status时已经提示了如何回退啦!)
总结一下:
回退可以只使用git restore,也是git推荐的用法,其中加上–staged将staged提交回退到工作目录,没加–staged是回退工作目录到修改前。后面自定义了git unstage = git restore --staged便于理解。
- drop files
前面5.将刚刚untracked的test文件删除。这里可以手动删除untracked文件,对git并无影响。但如果有很多文件想直接清除。使用git clean
1
2
3
4
5
6
7
8
9
10
11
12
13
14
15
16
17
18
19
20
21
22
23
24
$ git st
On branch master
Untracked files:
  (use "git add <file>..." to include in what will be committed)
        test

nothing added to commit but untracked files present (use "git add" to track)

$ git clean -n
Would remove test

$ git clean -i
Would remove the following item:
  test
*** Commands ***
    1: clean                2: filter by pattern    3: select by numbers
    4: ask each             5: quit                 6: help
What now> 1
Removing test

$ git st
On branch master
nothing to commit, working tree clean
git clean -f删除当前目录下的未跟踪文件git clean -fd删除当前目录下的未跟踪文件和文件夹git clean -xfd删除当前目录下的未跟踪文件、文件夹以及 gitignore 中指定的文件或目录git clean -n在执行删除前先预览会删除哪些文件或目录,防止误删重要内容.
- 一键清空工作空间的变更
git reset .撤销暂存区的所有文件git checkout .撤销工作区的所有修改,不包含未跟踪的文件或文件夹git clean -fd删除工作区的所有未跟踪文件和文件夹
Reference: https://stackoverflow.com/questions/58003030/what-is-the-git-restore-command-and-what-is-the-difference-between-git-restor>
Git远程分支
Git branch git checkout
Git进阶
Git玩法
Git CLI
在终端使用ubuntu的时候想,很多大佬玩编程、管理项目的时候会用纯命令行终端的方式,这种情况下要如何维护管理Github(或者Gittee)这种云端仓库呢。比如说,将本地开发的一个项目发布到云端。
要实现这个需求,我们一般是怎么做的。
- 在云端(github)点击创建仓库,填写相关信息,创建一个空的仓库;
- 在本地仓库,git clone、git remote add-url,关联上云端仓库(如果没有配置登录用户先配置https登录或ssh)。
- 然后git push提交。
这里面最大的问题就是没办法在终端打开云端进行图形化操作,那要实现命令行管理(装B)怎么做呢,答案就是使用GIT CLI(以往HUB的继任者)。在Github克隆代码时,可以看到三个选项:HTTPS、SSH和Github CLI,我们要使用的就是这第三个。

GIT CLI的使用:https://cli.github.com/manual/,参考官网教程。
首先安装CLI,基于ubuntu:
1
2
3
4
curl -fsSL https://cli.github.com/packages/githubcli-archive-keyring.gpg | sudo dd of=/usr/share/keyrings/githubcli-archive-keyring.gpg
echo "deb [arch=$(dpkg --print-architecture) signed-by=/usr/share/keyrings/githubcli-archive-keyring.gpg] https://cli.github.com/packages stable main" | sudo tee /etc/apt/sources.list.d/github-cli.list > /dev/null
sudo apt update
sudo apt install gh
然后配置登录信息,gh auth login,依照提示进行,本人的选项:
1
2
3
4
5
6
7
8
9
10
11
12
13
? What account do you want to log into? GitHub.com
? What is your preferred protocol for Git operations? SSH
? Generate a new SSH key to add to your GitHub account? Yes
? Enter a passphrase for your new SSH key (Optional) ****
? How would you like to authenticate GitHub CLI? Login with a web browser
? How would you like to authenticate GitHub CLI? Paste an authentication token
Tip: you can generate a Personal Access Token here https://github.com/settings/tokens
The minimum required scopes are 'repo', 'read:org', 'admin:public_key'.
? Paste your authentication token: ****************************************
- gh config set -h github.com git_protocol ssh
✓ Configured git protocol
✓ Uploaded the SSH key to your GitHub account: /home/olimi/.ssh/id_ed25519.pub
✓ Logged in as Olimiya
需要到github.com获取一个token,访问路径为https://github.com/settings/tokens(哈哈还是需要访问github的browser,不过只需要一次)。
之后就可以使用gh repo create命令行创建云端仓库。再使用git进行管理。
别名
提高git易用性的技巧,最早不喜欢git的原因就是认为记命令太麻烦,有些命令确实不好记,或者不理解原理,之后用多了就感觉一些常用的功能都需要打很多字母,不够便捷。
一些别名(主要是git manual中都推荐的)
1
2
3
4
5
6
7
$ git config --global alias.co checkout
$ git config --global alias.br branch
$ git config --global alias.ci commit
$ git config --global alias.st status
$ git config --global alias.unstage 'reset HEAD --'
$ git config --global alias.last 'log -1 HEAD'
$ git config --global alias.visual '!gitk'