需求
需求是:类似于Qt Creator或者VS Code一样,提供单机软件的主题切换功能。
Simple Thing
其中颜色等配置切换可采取Qt Creator的Settings文档格式或者VS Code的json格式定义。 如果仅提供最基本的内嵌主题,则直接更换QSS设计即可(设置于顶层界面,需确保所有子界面均为顶层界面的孩子/孩子的孩子)。
问题
QSS样式中存在一个难题,即QSS无法设置图标颜色。如Qt Creator中浅色主题显示的是黑色图标,而黑色主题显示的是白色图标。针对该问题进行探索。
解决思路
主题切换时,软件的图标配色不能同样通过QSS设置修改。因此暂时不相应变更,建议图标颜色(标准)下使用通用性较强的配色。(VS Code中即采用该方法,切换主题不修改图标)。【鸵鸟算法万岁!】
可供参考的思路为(Qt Creator中做法): 构建自己的Icon类,储存图标文件和颜色(主题)信息,所有地方均使用自定义图标类,通过icon方法转化为QIcon。其中颜色绘制通过读取QImage,动态修改像素值进行构建。参考: 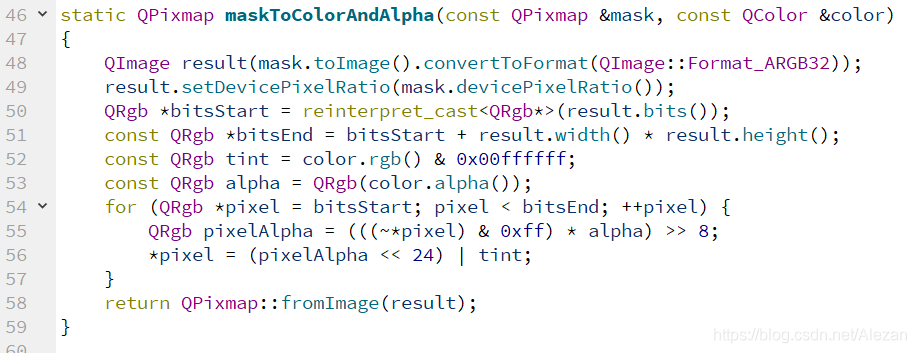
构建出类似于QIcon的较通用性接口较为复杂。建议参考Qt Creator源码(src/plugins/coreplugin/icon)。
进一步地,可提供出类似于Qt Creator的主题更换机制,便于用户自定义主题。思路是通过QSetting和预定义主题设置枚举完成。同样参考Qt Creator源码(src/plugins/coreplugin/themeChooser、theme)。
源码探究
探索中暂废弃的思路: QIcon本质绘制(paint)通过QIconEngine的paint.
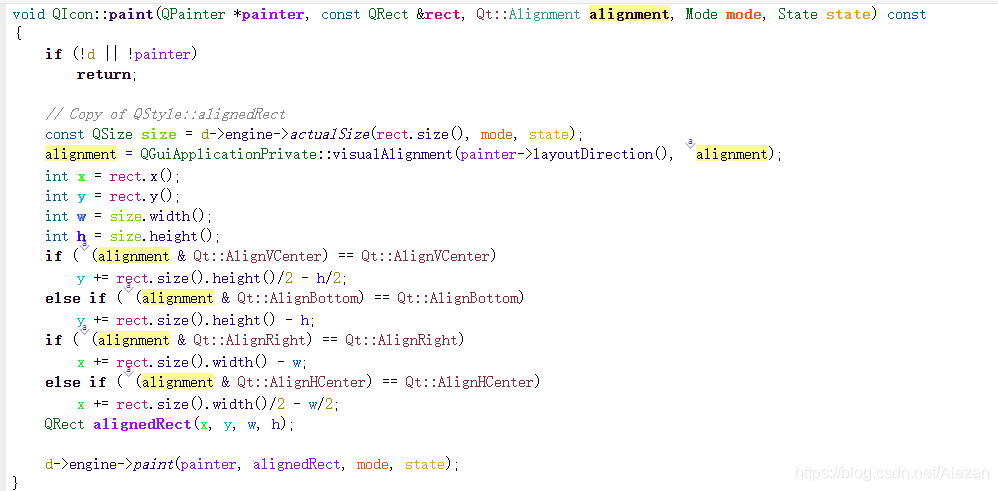 QIconEngine为纯虚基类,Qt库提供的继承子类为QPixmapIconEngine(位于qt private类定义,非暴露接口,不能继承)和QIconLoaderEngine。Png等文件资源加载默认使用QPixmapIconEngine。QPixmapIconEngine中去绘制QPixmap,而pixmap图标状态(State)模式(Mode)等以及Style设置等动态获取(储存于缓冲池中)。本质上主要是通过QGuiApplicationPrivate::applyQIconStyleHelper获取,除了最基本也是图标主要显示的情景,即Normal的Mode外。 参考:

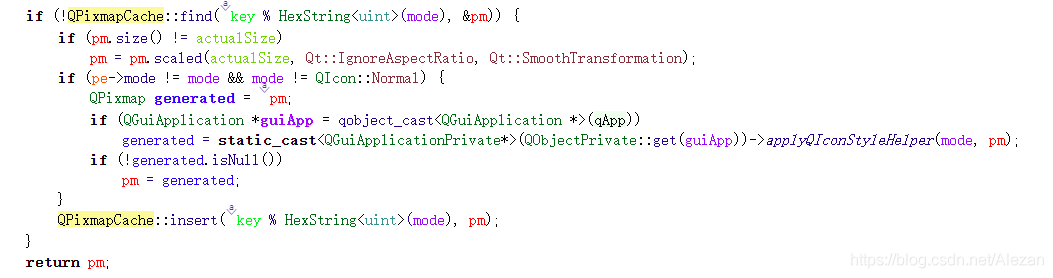
而applyQIconStyleHelper被QApplicationPrivate重写后本质上通过QStyle的generatedIconPixmap通过枚举不同状态真正绘制出不同的pixmap(同样是通过QImage动态更新像素点)。 
1
2
3
4
5
6
7
8
9
10
11
12
13
14
15
16
17
18
19
20
21
22
23
24
25
26
27
28
29
30
31
32
33
34
35
36
37
38
39
40
41
42
43
44
45
46
47
48
49
50
51
52
53
54
55
56
57
58
59
60
61
62
63
/*! \reimp */
QPixmap QCommonStyle::generatedIconPixmap(QIcon::Mode iconMode, const QPixmap &pixmap,
                                          const QStyleOption *opt) const
{
    switch (iconMode) {
    case QIcon::Disabled: {
        QImage im = pixmap.toImage().convertToFormat(QImage::Format_ARGB32);
        // Create a colortable based on the background (black -> bg -> white)
        QColor bg = opt->palette.color(QPalette::Disabled, QPalette::Window);
        int red = bg.red();
        int green = bg.green();
        int blue = bg.blue();
        uchar reds[256], greens[256], blues[256];
        for (int i=0; i<128; ++i) {
            reds[i]   = uchar((red   * (i<<1)) >> 8);
            greens[i] = uchar((green * (i<<1)) >> 8);
            blues[i]  = uchar((blue  * (i<<1)) >> 8);
        }
        for (int i=0; i<128; ++i) {
            reds[i+128]   = uchar(qMin(red   + (i << 1), 255));
            greens[i+128] = uchar(qMin(green + (i << 1), 255));
            blues[i+128]  = uchar(qMin(blue  + (i << 1), 255));
        }
        int intensity = qt_intensity(red, green, blue);
        const int factor = 191;
        // High intensity colors needs dark shifting in the color table, while
        // low intensity colors needs light shifting. This is to increase the
        // perceived contrast.
        if ((red - factor > green && red - factor > blue)
            || (green - factor > red && green - factor > blue)
            || (blue - factor > red && blue - factor > green))
            intensity = qMin(255, intensity + 91);
        else if (intensity <= 128)
            intensity -= 51;
        for (int y=0; y<im.height(); ++y) {
            QRgb *scanLine = (QRgb*)im.scanLine(y);
            for (int x=0; x<im.width(); ++x) {
                QRgb pixel = *scanLine;
                // Calculate color table index, taking intensity adjustment
                // and a magic offset into account.
                uint ci = uint(qGray(pixel)/3 + (130 - intensity / 3));
                *scanLine = qRgba(reds[ci], greens[ci], blues[ci], qAlpha(pixel));
                ++scanLine;
            }
        }
        return QPixmap::fromImage(im);
    }
    case QIcon::Selected: {
        QImage img = pixmap.toImage().convertToFormat(QImage::Format_ARGB32_Premultiplied);
        QColor color = opt->palette.color(QPalette::Normal, QPalette::Highlight);
        color.setAlphaF(qreal(0.3));
        QPainter painter(&img);
        painter.setCompositionMode(QPainter::CompositionMode_SourceAtop);
        painter.fillRect(0, 0, img.width(), img.height(), color);
        painter.end();
        return QPixmap::fromImage(img); }
    case QIcon::Active:
        return pixmap;
    default:
        break;
    }
    return pixmap;
}
根据上述描述,图标绘制修改通过QIconEngine,但其中真正修改还是在QStyle中。因此需要同时重写QIconEngine和QStyle。重写QIconEngine是为了处理一般情况,即Normal的处理;重写QStyle是为了处理不同模式中图标的绘制。当然这是QPixmapIconEngine的做法(本身也不属于Qt 标准库),也可以把图标绘制放入QIconEngine中(不如说应该这么做)。
重写之后要怎么做呢(重写参考QPixmapIconEngine和QCommonStyle)。QIconEngine通过编写导出插件,至于qt目录中Plugins/iconengines目录中,注册相应文件资源尾缀的处理引擎,或者直接QIcon(new MyIconEngine。QStyle则还要重写QStyleFactory用于提供创建QStyle接口,然后同样作为插件放入Plugins/styles中(这里有一个很重要的问题是,不明确指定style的情况下,qt会自动选择style,如windows10平台为windowsvistastyle,这样的话指定自定义style就需要处理各种平台的选择了。同样的,windowsvistastyle不是标准qt库,不能继承和重写)。
详情参考qt中提供的插件机制。